
Is this a fair comparison? Maybe not. After all, Costco is a warehouse club that has a consumer oriented 1 hour photo “lab” while Bay Photo is a high-end professional printing service. Nevertheless, I thought it would be an interesting comparison. One would expect higher quality from Bay Photo with an equally higher price while Costco is convenient and very inexpensive.
[Read Round 2: I test a local Austin camera store against Costco and Bay Photo]
Costco
There are currently 572 stores around the world with $72 billion in sales. They are the king of warehouse stores in the United States (bigger than Sam’s Club) and are known for great customer service. A yearly membership fee entitles members to buy stuff in bulk at lower prices. They sell a whole range of products–of which one of the departments is a 1 hour photo lab. Photographs can be submitted online through the web or at kiosks at the stores.
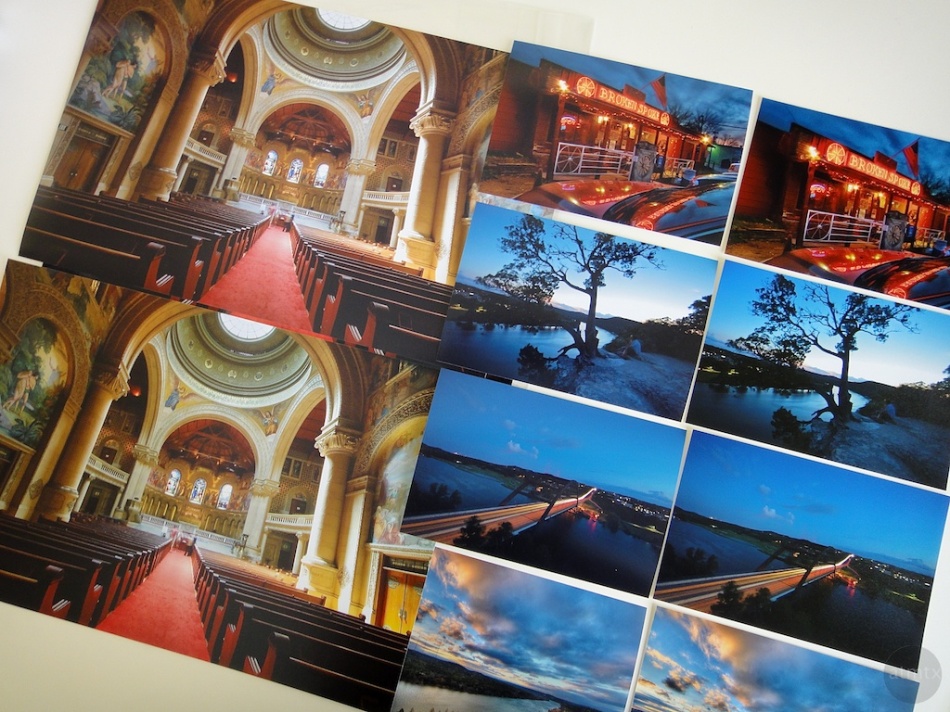
I downloaded 6 full resolution landscape, cityscape and interior photographs from my online portfolio. They were uploaded to Costco at full resolution via the web with Auto Correct turned on. 5 of the images were printed on luster finished paper at 4 x 6 inches. My favorite interior image was printed on luster at 8 x 12 inches. The photographs were printed within 15 minutes and I was notified my email. I picked up the prints on the way home from work.
Bay Photo
Founded in 1976, Bay Photo specializes in professional printing services. I don’t have their sales numbers but I’m sure its much lower than Costco’s sales. They have one location in Santa Cruz, California. Bay Photo is the default option in SmugMug’s Professional service. SmugMug picked Bay Photo after a shootout with several printing vendors.
The same 6 images from my portfolio where uploaded to Bay Photo directly through SmugMug. The same photos were printed at the same sizes on luster paper with manual color correction. For fun, I also printed one 8 x 12 and one 4 x 6 on the metallic paper. Costco does not have an option for metallic. The prints were ordered on Tuesday, printed several hours later and shipped the same day. They arrived at my house today on Thursday. I only paid for the basic 3 – 5 day shipping and was pleasantly surprised at the quick delivery.
The Process
As you can tell, this far from a scientific test. I only ordered a small number of prints and I did not re-order them to check for printing consistency. That said, it does allow me to roughly compare the prints from a single set of orders placed at each service. I opted for manual color correction at Bay Photo (which is my default option) to see how good it is. At Bay Photo, real human beings visibly inspect and correct each photo when manual color correction is requested. I also enabled Auto-Correct when ordering at Costco. I talked to the photo print person at Costco and she said that Auto-Correct doesn’t actually change any colors but mostly brightens the image if required.
My monitor is not color calibrated with special hardware. It is set to Gamma 2.2 and a white point of D65 on a 24″ iMac, which from what I read, should be the ideal setup for a sRGB colorspace. I also shoot in sRGB so I have a simple sRGB workflow. According to Will Crockett from ShootSmarter.com (In this article registration required) he says the 24″ iMac has a screen good enough for a sRGB workflow.
I laid the images out of the table and compared the results. I looked at them in natural outdoor light, mixed natural and warm fluorescent light, only warm fluorescent light and finally halogen lights.
The Results
I first opened the package from Bay Photo during the daytime with soft natural light. My large 8 x 12 interior image of the church looked great but didn’t seem too different from the Costco version. The color was subtly different and the Bay Photo print seemed a bit more vivid but nothing too different. I then compared the other images. Photographs that have deep blues from evening landscapes showed a more saturated and deeper blue in the Bay Photo version. Then I noticed that the greens also were more saturated and lively. In the Costco version, the vegetation was muted and more yellowish-green rather than a saturated, deep green. When I compared the color to my iMac monitor, neither prints matched the monitor exactly though the Bay Photo version seemed closer.
As it got a bit darker in the evening, I turned on my warm fluorescent desk lamp. There was still ample natural light coming through the windows so there was a mix of lights. This is when the differences were most dramatic. I noticed that all of the Costco prints, to some degree, had a yellowish-pinkish cast to them. Bay’s vivid blues and greens stood out even more. The Bay Photo prints definitely seems more saturated and colorful. This difference was dramatic in some and less so in other types of images. What really blew me away was when I compared these prints to my iMac monitor. Under this mixed light, the Bay Photo colors matched my screen exactly. This was amazing and I must admit the first time I’ve seen that happen. I’ve been frustrated with printing in general but this was a game changer.
I also looked at these images under my warm desk lamp without any outdoor, natural light. My desk lamp is quite warm (yellowish) and this made the Costco prints even more yellowish-pink. The Bay Photo prints also looked warmer, slightly warmer than the monitor, but again, still the Bay images were closer to the screen. I also compared the images under halogen lights. The color differences were less dramatic, similar to the natural daylight. The Bay Photo images still had the edge.
Apart from the color there were other differences. The summary below highlights them. There is one strange issue worth mentioning. I noticed on several of the Costco prints the smooth areas such as the skies had these strange mottled streaks. You have to look carefully but it’s there. I don’t know if this is an anomaly with these particular prints. All of the Bay Photo prints looked fine. One of the Bay Prints had a slight pattern that was different from Costco.
Cost
This is where Costco has the clear advantage. The prices at Costco are at least 3 times less expensive than Bay Photo. For certain larger print sizes the price differential is even greater. In addition, I had to pay an extra fee for shipping and handling from Bay Photo. The packaging was first-rate and it seems like they will properly survive any rough handling. I looked at some prices around the net. I discovered that Bay’s prices, especially for the larger sizes, are in line with the other places. It’s really Costco’s exceptionally low prices that makes them the bargain choice.
Conclusion
So clearly you get more by paying more, at least at Bay Photo. This was not a given since Costco actually has a good reputation for prints and used by some pros. If you were willing to spend a lot of time to calibrate your workflow and hand tweak each photograph, Costco maybe a very good solution. In the past, I have made some attempts at color correction when printing at Costco. While the results were OK, they never did match my monitor exactly. Also, if the photographs you are printing don’t have to be critically accurate in color, then again Costco will be a great bargain solution.
If however, you want easy, accurate color for the more important prints, Bay Photo, I believe, is worth the extra cost. If I’m going to print landscape images large to be framed as art pieces, I think the extra cost will be worth it. The cost of framing the print will be a greater factor than the print cost differential. While I did not print any people in these tests, my assumption is the color will also be more accurate for portraits at Bay Photo. Prints from important occasions such as weddings will also benefit from Bay Photo’s higher quality.
I mentioned in the beginning that I also made two test prints on metallic paper. I might save the details for another blog post, however, I can say that they were very impressive. Especially for the type of images I printed. I’m not sure if they will work for portraits but for vivid HDR landscapes and cityscapes, these metallic prints are wonderful. The good news is that they don’t cost that much more than the regular luster paper. The metallic option is not available at Costco.
Summary
Paper
Costco: Standard paper, curled, finger print resistance, good.
Bay Photo: Paper slightly thicker, flat, finger print resistance, very good.
Both had a similar luster texture.
Overall Image Quality
Costco: A little dull.
Bay Photo: More vibrant.
Both had similar brightness and contrast.
Color
Costco: Yellowish-pinkish cast, duller greens and blues.
Bay Photo: More neutral color cast, blue more saturated, greens more vibrant.
Printing
Costco: Blotchy patterns in smooth sky areas.
Bay Photo: minimal / none
Cost
Costco: Very Low prices.
Bay Photo: Roughly 3 to 5 times more with manual color correction. Extra cost for shipping.
Availability
Costco: As little as an hour.
Bay Photo: From 1-2 days for express shipping and longer depending on shipping option.
Was this article useful? Please support this blog by clicking on my Amazon Link before buying anything.

Andy,
Very nice comparison. I am also interested in this since I started a smugmug site recently also.
I did some test prints from Bay photo also, and I didn’t notice much of a difference in their color correction. My current idea is to allow them to color correct portraits, but that my HDR work I will color correct myself.
One other thing is that smugmug also offers EZprints. They are about half the cost of Bay Photo, and I haven’t tried them out yet. As you may know, on smugmug you can specify either Bay Photo or EZ Prints for any gallery or photo.
Anyways, good comparison!
thanks
john
Thanks John, I read somewhere (not sure where now) that if you aren’t going to use the manual color correction with Bay Photo, then its going to look pretty similar to any other service. Haven’t tested this myself to see if its true.
Nice comparison Andy, I haven’t looked into this yet so I am glad you did! Thanks for sharing. Jim
Thanks Jim. It was a simple test but I thought it was interesting.
Informative post, Andy, thanks for taking the time to do this. I’m curious if you’ve tried our local option here in Austin, Precision Camera? I’ve had very good results from them in the past (I haven’t ordered any prints in about 8 months). Also, not sure if they offer metallic, which is great for HDR images.
Its been a while since I printed at Precision. It might be interesting to give them a try to see how they do.
I have done a few large prints at Precision. I have not done any comparisons either.
Andy, I am not sure about your comment that without color correction Bay photo looks like EZ prints. I would have to believe that Bay photo still would look better.
I had Bay color correct an image of mine at different sizes including one on the aluminum format. I also had the free business cards printed from Moo from a Smugmug promotion. The image looks identical on the Moo business card to the Bay photo lustre, glossy and metallic in color correction. The aluminum format was a bit more purple in the blue areas. Like I said above, I think that the human at Bay would have a harder time color correcting a HDR image, since it is hyper realistic. I am going to do some more testing, but right now, I think in the future, I will not have Bay color correct the HDR photos.
Great to hear your experiences. I would love to get your results as you find out more. I also made moo cards so I will compare the colors. I made the minicards so I was slightly disappointed with images with detail since the details just don’t show up on those small cards. Other card images with simpler designs came out great.
BTW, I found where I read the statement that “labs without color corrections are about the same” Its actually on SmugMug’s site. Look at the bottom line section on the bottom right.
http://www.smugmug.com/photos/pro-print-labs-test-results/
Andy,
That link you provided was a comparison of Bay photo with some other services. It doesn’t include EZ prints on that page.
WHCC, Mpix and ProDPI are not offered via smugmug so I still have to believe that at half the cost, EX print is a lower quality option regardless of the color correction.
I will have to do some testing with color correction off and from EZ print.
thanks for the info
john
Auto correction should not be turned on if ordering from Costco if you want accurate prints. But, you must calibrate your monitor accurately. The girl you spoke to is wrong. She assumes that the color doesn’t get effected. She is wrong. Yes it can and does in certain photos. I run a lab for Costco and our professionals produce accurate prints everyday. The first thing a pro must do is calibrate their monitor. If not, then they are wasting their time adjusting any color/brightness/contrast of their image. Also, the ambient room lighting has an effect on final output. We offer profile for complete accuracy. We use DryCreekPhoto for our profiling. Also, the paper in slightly thinner. Thats what you get for the lower cost. We use Fuji Crystal Archive Glossy/Lustre printed on either Noritsu or Fuji Silver Halide printers @ 300-320dpi. Many pros use our lab for wedding proofs. You can pay more and have a pro lab correct your work. I personally use pro labs when printing my fine art prints on metallic paper with no corrections. Other than that, our Fuji Glossy and Lustre papers are very good. Never choose Auto-Correction On and expect accurate results. Its not made for pros and sometimes has mixed results (over contrasty, color shifts, blown highlights etc…) Always choose Auto Off and make sure your end is accurate. Otherwise choose to pay more for a pro lab. 🙂 Oh and our canvas prints start at $34.99 for a 12″x16″ Canvas wrap. Free shipping to warehouse. That is a great deal. I wish we had metallic paper! Imagine getting to print your own work. I love my day job.
Jim, thank you very much for your long and detailed reply. There is no question Costo offers tremendous value in their prints as well as other products at the store. I am a frequent customer. I also personally know pros that have produced some fantastic colors and quality from their Costco prints. However, for people for do not what to profile their monitor and color adjust their rooms for optimal viewing, there is a benefit to Pro labs. Sure they are a lot more expensive. But time is also a factor as well as getting the extra equipment to do it correctly yourself.
For the people that want and can adjust their processing environment, Costco can be a fantastic place. After all, why pay for Pro labs if you are not going to get them to color adjust your prints.
Nice to See someone comparing prints. This test was apples & oranges. Costco is wrong if they say “Auto Corrections” only control brightness of prints in “Auto Correct”, yes mostly true, but the machine is in auto for both. I did this same test with My pro lab , Miller’s Professional imaging, who only accept professional photographers as clients. Miller’s has the same service as Bay. However, for my test and the economical impact, I had prints made at Costco with Auto Corrections OFF as well as using Miller’s online order system with no corrections. Costco prints were as good and a tad better in some areas. If you’re unhappy with the Costco print they’ll prioriytize your order and reprint on the spot with their auto corrections. In my case Costco prints with NO corrections is ALWAYS spot on to my color corrected monitor, even with prints from other Costco labs around the country. NOTE: I use Costco for my personal portfolio prints, not for printing orders for customers and clients. Quality of chemistry and paper are best from a lab with professional standards which provides more consitency in print quality and service.
Thanks a lot for this comparison. I’ll have to consider costco as a budget option in the future. Maybe I’ll use it to print the samples that I’ll show clients (like Dale mentioned printing his portfolio).
Did you look into printing directly from Bay Photo using their ROES program? It is slightly cheaper than through Smugmug. Still not as cheap as Costco, but a tad more competitive.
Chris, thanks for the visit and comment. I have not used the Bay Photo ROES program.
Auto Correction ON at Costco was a huge mistake. You should redo the comparison again. It is an unfair comparison with auto correction ON. It changes many things. Auto Correction is for mom and pop family uploads who take bad photos consistently.
I’ve used Costco for smaller prints for years because the printer they use is world class and at a fraction of the price of labs. I used to use custom labs for 8 years, selling thousands of prints per month wholesale in Hawaii. Now everything smaller is with Costco.
And then, we just compared my lab to Costco for a 24×36 tropical print and everyone preferred the Costco over the custom lab print.
WTF
I look forward to the day when Costco does metal.
Bay photo is great for a print or two. But way too expensive for anyone trying to sell volume for commercial purposes and who’s trying to compete with others in a very competitive market.
Vince
@Vince:
Making more profit from the print certainly does help, but I’m concerned with the cusomer experience. What is Costco’s service like?
1. I know they don’t integrate with the client proofing services offered by Zenfolio, Smugmug, and others. Being able to have clients order prints directly from their client gallery seems like a boon to me.
2. What if the Costco print doesn’t turn out they way you want? My BayPhoto ROES and Smugmug (via BayPhoto) prints have all turned out pretty accurate. If there is a problem then these services offer replacement/refund policies. Smugmug has a money-back guarantee.
How does that compare to Costco?
Costco offers awesome prints on consumer level while Bay Photo offers awesome prints on a professional level. Bay Photo has better paper & size options while Costco offers quicker service and cheaper price.
PS. Costco has good customer service so any problem with the print will always be resolved in your favor
Thanks for your post Dark Eclipse Studios. Costco has great customer service in general so I’m sure they will be more than happy to reprint if you are not satisfied.
My experience with Costco was about the same as yours, until I profiled everything, then BANG! Starting with my camera, I used a profile especially created with Color Visions Spyder software and took a photo, then I calibrated my monitor with Spyder’s Elite package and used Lightroom 5 to soft profile the image using Epson 7880 printer and Fujifilm Photo Satin Paper (270 gsm) and Fujifilm RC Semi-Gloss for Poster Board, and finally I made sure my Costco had an Epson 7880 printer and asked for ‘Poster Prints.” This gets your images printed on the Epson 7880, and not their general printer, ust that one for ‘run of the mill photos.’ Dry Creek Photo provides the profiles for all the Costco Poster printers. One other thing you have to do is to turn off the “auto-correct” in the Costco Account Information page under Print Preferences, otherwise you are double profiling the work – bad thing. If you go to http://www.drycreekphoto.com you will find a wealth of information to create GREAT Costco printed – for cheap. I have never used ATMTX, but just bookmarked it. I thought I’d share all this info knowing and maybe someone might be able to use this productively, as I have. Good luck! I think you can get away without profiling your camera, but it helps, and one can use PhotoShop to do this, but with a different workflow.
Dry Creek Photo has better explanations for all of this online, have fun. It took a few attempts to get it right, but it was spot on once everything was set. It’s like having a $10,000 calibrated printer down the block from me! I even talked to their online people and some of them have a real understanding of this process and some are in the dark – so ask for the right person and they can really help!
http://www.drycreekphoto.com/Learn/monitor_calibration.htm
http://www.drycreekphoto.com/icc/CostcoPosterPrinters.html
http://www.drycreekphoto.com/icc/ (This is where you can tell what Costco’s have what printers available to you)
Franklin Miller, M.S.
@ FranklinMillerArt.com
Franklin, thank you very much for the detailed writeup and information. I heard that they have inkjet printed poster prints too. That maybe a nice, inexpensive option. I actually like inkjet prints more than the traditional mini-lab prints now. I haven’t gotten around to writing about it but I did get my own printer, which I’ve been happy with. I’ll be writing about that in the near future.
Another pro Costco review can be found here http://www.ediblefrog.com/topics/froguser/costco_canvases_-_18x24_in._canvas_and_16x48_in._panos
I read your post it is very nice and informative post. We are also in this field and welcome you to visit our website.
Thanks for taking the time to post blatant spam…
Try printing the same photos from Costco after downloading their printer profiles. You’ll find a very big difference in the quality of your photos once you learn how to use the profiles to get your photos looking the way you want them to look. If you do not use the profiles, your prints will look dull and not have the pop you would expect. I get excellent results from Costco. My photos sell in Galleries and in Art Festival Booths.
Thanks, Steve. I’ll look into that for the next time.
I am really enjoying the theme/design of your weblog. Do you ever run into any web browser compatibility issues?
A small number of my blog readers have complained
about my website not working correctly in Explorer but looks great in Chrome.
Do you have any suggestions to help fix this problem?
Thank you, glad you like the new design. I haven’t done extensive tests in various browsers and unfortunately, I don’t know enough about web/CSS to fix or help with any problems. Sorry.